
As an Amazon Associate I earn from qualifying purchases.
You do not need a $1,500 embroidery machine to stitch a monogram on a tote bag or a flower on a denim jacket. Every zigzag sewing machine ever made can do free-motion embroidery. The technique is old, the setup costs almost nothing, and the results have a handmade character that computerized embroidery cannot imitate.
Free-motion embroidery means you drop the feed dogs, fit a darning foot, and move the fabric by hand under the needle. You become the embroidery unit. Your hands control the direction, the machine controls the speed, and the combination draws with thread. It takes practice, but the learning curve is honest: an hour of doodling on scraps teaches you more than any video.
This guide covers the setup, the stabilizer and hoop choices that make or break the result, a simple monogram walkthrough, and the mistakes that turn first attempts into thread nests.
TL;DR: To embroider on a regular sewing machine, drop or cover the feed dogs, install a darning (free-motion) foot, and set a straight stitch. Hoop your fabric with stabilizer underneath, lower the presser foot, and move the hoop slowly and steadily with both hands while the machine runs at a medium speed. Stabilizer is mandatory, not optional. Practice outlines and fills on scraps before attempting a monogram, and keep your hands moving at a constant pace so the stitches stay even.
What Free-Motion Embroidery Is (and Isn’t)
Free-motion embroidery is manual, not automatic. There are no built-in designs, no USB sticks, no hoop that moves itself. You draw the design, either by following lines you marked on the fabric or by improvising, and you steer the fabric under the needle to lay the stitches down.
What it is great for: monograms, names, simple outlines, stippling and meander fills on quilts, thread painting (dense free-motion fills that look like painting), mending with decorative stitching, and personalizing gifts. What it is not: a substitute for dense, precise computerized designs like detailed logos. Those need an embroidery machine. But for the personal, slightly imperfect style that looks hand-crafted, free-motion wins on charm and costs almost nothing to start.
Setup: Feed Dogs, Foot, and Stitch
Drop or cover the feed dogs. The feed dogs are the teeth under the needle plate that move fabric forward. For free-motion work, they must be out of the equation so you control the movement. Most machines have a switch or lever to drop them. If yours does not, a feed dog cover plate (often included with the machine) snaps over them. Check your manual.
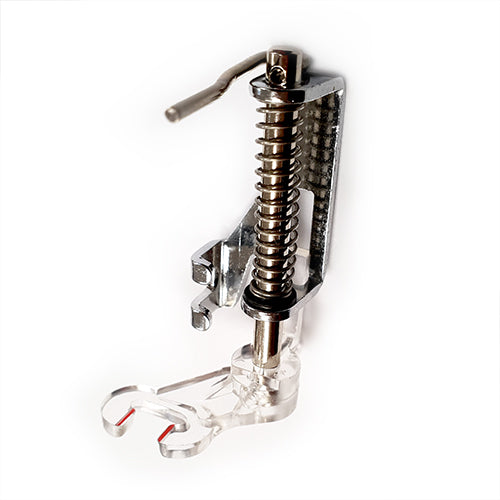
Install a darning foot, also called a free-motion foot. This is a small foot, often with an open toe and a spring mechanism, that hops up and down with the needle. It holds the fabric down at the moment of stitch formation but releases it between stitches so you can move freely. It is the one purchase this technique truly requires.
A universal low-shank darning foot fits most domestic machines. The DREAMSTITCH low-shank darning foot is a widely used option that owners report fits Brother, Singer, Janome, and similar machines.
Set a straight stitch at normal length. The stitch length setting does not matter much because you are not using the feed dogs, but a medium setting is a good default. Reduce the top tension slightly if your test shows the bobbin thread pulling to the top.
Speed: medium, steady. Fast machine speed with slow hands makes tiny dense stitches; slow machine speed with fast hands makes long loopy stitches. The goal is a consistent ratio, which only comes from practice.
Stabilizer: The Non-Negotiable
Here is the rule sewing teachers repeat until students believe it: stabilizer is not optional in machine embroidery. Without it, the fabric shifts, puckers, and distorts under hundreds of needle penetrations, and no amount of skill fixes that afterward.
For stable woven fabrics (cotton, denim, canvas): use a medium-weight tear-away stabilizer under the fabric in the hoop. It supports the stitching and tears away cleanly afterward.
For knits and stretchy fabrics: use cut-away stabilizer, which stays in the garment permanently and keeps the design from distorting in the wash. Tear-away on knits is a recipe for wavy, ruined designs.
For towels and napped fabrics: add a water-soluble topping film over the fabric so stitches sit on top of the pile instead of sinking into it.
A tear-away stabilizer roll cut to hoop size is the economical way to keep a supply on hand. Cut it a couple of inches larger than your hoop all around so the hoop grips stabilizer, not just fabric.
If the design uses a different fabric or stabilizer than usual, run it through the embroidery needle selector before you hoop the project.
Hooping
Use a standard wooden or plastic embroidery hoop, the kind used for hand embroidery. A 7-inch hoop is a versatile size for monograms and small motifs, and a 12-pack of 7-inch bamboo hoops is inexpensive enough to keep several projects hooped at once.
Hoop the fabric and stabilizer together as one sandwich, with the stabilizer underneath. The fabric should be taut but not stretched. Over-tightening distorts the weave, and the design will pucker when released. You should be able to tap the hooped fabric and hear a soft drum sound, not a tight twang.
Do not hoop and then draw your design; draw first with a washable fabric marker, then hoop, so the design stays centered and undistorted.
Monogram Walkthrough: Your First Project
A single initial on a tote bag or napkin is the perfect first project. Here is the full sequence:
- Draw the letter on your fabric with a heat-erasable or washable marker, about 2 to 3 inches tall. Simple block letters are easier than script for a first attempt.
- Cut stabilizer a few inches larger than your hoop and hoop fabric plus stabilizer together.
- Set up the machine: feed dogs down, darning foot on, straight stitch, medium speed. Thread with all-purpose polyester thread on top and in the bobbin.
- Position and start. Place the hoop under the needle with the needle at the start of your letter. Lower the presser foot (yes, lower it; the darning foot needs to be down to engage the tension). Take one stitch, pull the bobbin thread tail to the top, and hold both tails for the first few stitches to prevent a nest.
- Outline the letter. Move the hoop slowly and steadily, following your drawn line. Think of it as drawing with the needle. Keep your hands moving at a constant pace and let the machine run at a constant speed. Small, smooth movements beat fast, jerky ones.
- Fill (optional). For a filled monogram, stitch back and forth in tight rows inside the outline, like coloring with thread. Overlap each row slightly. This is slow but the result looks rich.
- Finish. When done, take a few tiny stitches in place to lock, trim the threads, remove the hoop, and tear away the stabilizer from the back. Press from the wrong side with a press cloth.

Practice Drills That Actually Work
Do not start on the gift. Spend an hour on scraps with these drills, which quilting teachers have used for decades:
The meander: stitch a continuous wandering line that never crosses itself, like a maze with no dead ends. This teaches smooth direction changes and is the foundation of stipple quilting.
Rows of loops: stitch cursive-style loops in neat rows. This teaches consistent speed and spacing.
Your name: write your name in marker and stitch over it. This is the direct rehearsal for monograms.
Spirals: stitch an inward spiral, then back out. This teaches tight curves.
Hoop a fresh scrap for each drill with stabilizer, and keep the finished drills. In a week you will be amazed at the difference between the first and the last.
Common Mistakes to Avoid
Forgetting the stabilizer. The fabric puckers and no technique fixes it after the fact. Always stabilize.
Leaving the feed dogs up. The machine fights your hands, the fabric jerks, and stitches go wild. Drop or cover them.
Using a regular presser foot. A standard foot holds the fabric down constantly, so you cannot move it. The darning foot’s hopping action is what makes free motion possible.
Moving hands faster than the machine. This makes long, loopy stitches and causes thread breaks. Slow your hands or speed up the machine until the ratio feels smooth.
Death-gripping the hoop. White knuckles mean jerky movements. Hold the hoop firmly but relaxed, with fingertips rather than a fist, and rest your forearms on the table.
Stitching too densely too soon. Beginners pack stitches too tightly, which perforates the fabric and snaps thread. Aim for breathing room between rows until your control improves.
Not lowering the presser foot. With the foot up, there is no top tension, and you get a nest on the first stitch. The darning foot must be down.
FAQs
Can I embroider with a regular sewing machine without any special attachments?
You need a darning (free-motion) foot, which is inexpensive and widely available. Beyond that, an embroidery hoop and stabilizer are the only other requirements. No embroidery unit or software is involved.
What is the difference between free-motion embroidery and an embroidery machine?
Free-motion is manual: you steer the fabric and create the design in real time. An embroidery machine is computerized: you load a digital design and the machine stitches it automatically. Free-motion is cheaper, more expressive, and less precise.
Why does my thread keep breaking?
The usual causes are moving the hoop too fast relative to machine speed, old or low-quality thread, a dull or wrong-size needle, or stitching too densely. Slow down your hands, use fresh all-purpose thread, and try a new 80/12 or 90/14 needle.
What stabilizer should I use for t-shirts?
Cut-away stabilizer, because it stays in the garment and supports the design through washing. Tear-away on knits leads to distortion. Use two layers for thin or very stretchy knits.
Can I do free-motion quilting and free-motion embroidery with the same setup?
Yes. The machine setup is identical: feed dogs down, darning foot on, straight stitch. Quilting moves the quilt sandwich to create texture; embroidery moves hooped fabric to create designs. The skills transfer directly.
How do I stop the bobbin thread from showing on top?
Slightly loosen the top tension, make sure the presser foot is down (engaging the tension discs), and keep your hand speed steady. Jerky fast movements yank the bobbin thread upward.