
As an Amazon Associate I earn from qualifying purchases.
An invisible zipper is the difference between a dress that looks homemade and one that looks store-bought. When it is done right, you see nothing but a clean seam with a tiny pull tab peeking out at the top. When it is done wrong, the teeth grin through the fabric, the seam puckers, and the whole garment looks off.
The good news is that the technique is not hard. It is just fussy about order. Press the teeth flat, baste your seam first, stitch close to the coil with the right foot, and press at the end. Sewing teachers recommend practicing on a scrap of quilting cotton before you touch your good fabric, because the second zipper always looks better than the first.
This guide walks through the full method for dresses, skirts, and pillow covers, plus which presser foot actually matters and the mistakes that ruin the invisible effect.
TL;DR: Buy a zipper about 2 inches longer than your opening. Baste the seam closed and press it open, then press the zipper coil flat with your iron. Mark the zipper stop on both sides, install an invisible zipper foot, and stitch each side close to the teeth, stopping above the zipper stop. Press from the right side and finish the remaining seam with a regular foot. The invisible zipper foot, not a regular zipper foot, is what makes the stitching sit close enough to disappear.
What You Need
You do not need much, but the foot is non-negotiable.
An invisible zipper. These have a fine coil that rolls to the back so the teeth hide inside the seam. They come in many colors, so match the zipper to your fabric, not your thread. For practice and for future projects, a multipack in assorted colors is the economical choice. A multipack of invisible zippers in assorted colors keeps you stocked for dresses, skirts, and pillows.
An invisible zipper foot. This is the tool that makes the whole thing work. It has two grooves underneath that unroll the coil and guide it while you sew, so the needle lands right next to the teeth. A regular zipper foot cannot do this, and the gap it leaves is exactly what makes a zipper look visible.
A universal snap-on invisible zipper foot fits most low-shank machines (Brother, Singer, Janome, Juki, and similar). It costs very little and lives in your notions drawer forever.
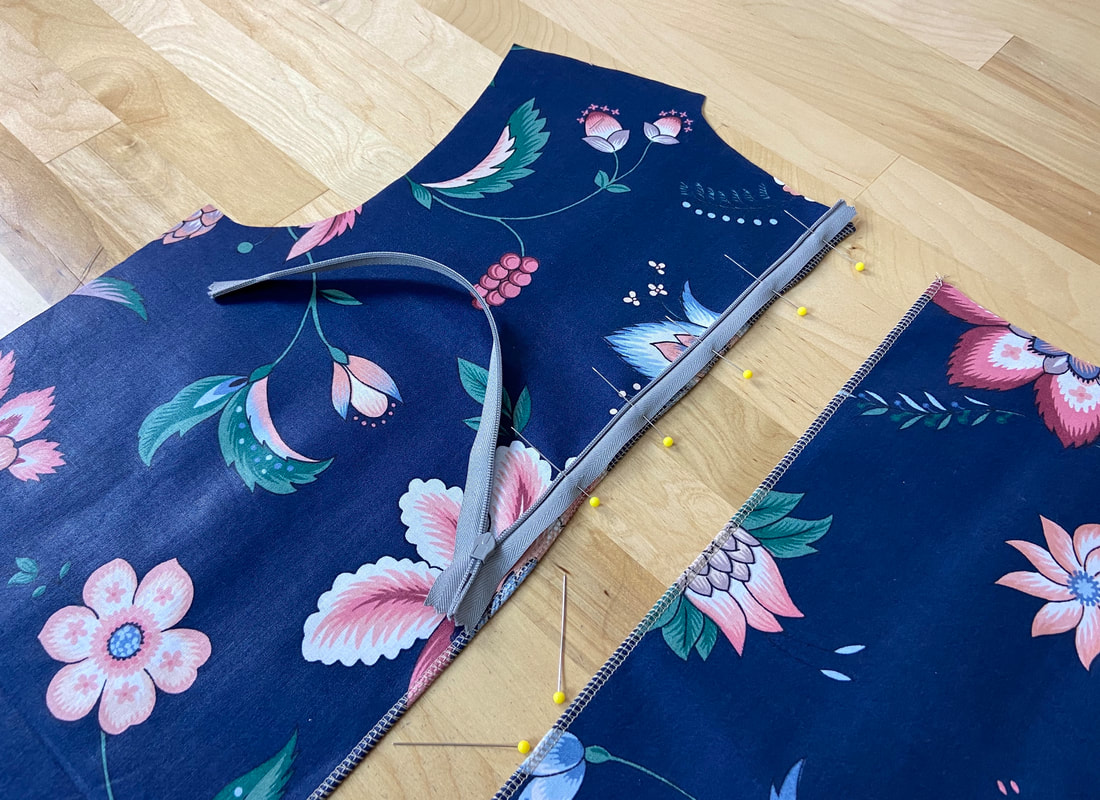
Step 1: Mark the Zipper Placement
Start with your seam basted closed. Sew the seam with a long basting stitch (4.0 mm or longer) exactly where the finished seam will go, then press the seam open. This gives you a crisp fold line on each side and, more importantly, a finished-looking seam above the zipper where the opening ends.
Decide where the zipper starts. On a dress or skirt, the top of the zipper usually sits 5/8 inch below the raw edge so it tucks under a waistband or neckline facing. Mark that point on both seam allowances with a fabric marker or a small snip.
Now the key measurement: the zipper should be about 2 inches longer than your opening. You stop stitching above the zipper stop, and that eats a little length, so a longer zipper saves you from a too-short opening. Standard dress zippers are 22 inches, which suits most side and back seams.
Step 2: Press the Zipper Teeth Flat
This is the step beginners skip, and it is the step that matters most. Lay the zipper face down and run your iron over the coil, rolling it back so the teeth lie flat and the stitching line is exposed right next to them. Use a medium heat and a press cloth if your zipper is polyester, which most are.
When the coil is rolled flat, the foot’s groove can cradle it and the needle can stitch a hair’s breadth from the teeth. If the coil springs back up, your stitching lands too far away and the zipper shows. Owners report that a quick press here fixes half of all visible-zipper problems before they start.
Step 3: Mark the Zipper Stop
Open the zipper and lay the right side of the zipper tape against the right side of the right seam allowance, teeth pointing toward the seam line. The top of the zipper tape should sit at your marked starting point.
Find the zipper stop, the little bar where the slider rests at the bottom. Mark the fabric at that point on both seam allowances. You will stop stitching about 1/2 inch above this mark, and marking it now keeps both sides even. Pin or hand-baste the zipper in place so it cannot shift while you sew.
Step 4: Install the Invisible Zipper Foot
Snap on the invisible zipper foot. Look underneath: you will see two parallel grooves. As you sew, one groove rides over the unrolled coil and holds it flat while the needle sews beside it. This is the entire secret of the technique.
Set your machine to a straight stitch at normal length (2.5 mm works well). Check your needle position. On most machines you want the needle centered; the foot’s groove does the guiding. Sew a test line on a scrap with the same zipper to confirm the needle clears the coil without hitting it.
Step 5: Stitch the Right Side
With the zipper open and face down on the right seam allowance, slide the coil into the foot’s groove so the teeth unroll flat under it. Start at the top of the zipper and sew downward, keeping the coil fed into the groove as you go. Go slowly. Your job is only to steer; the foot does the precision work.
Stop stitching about 1/2 inch above the zipper stop mark. Backstitch to lock the threads. Do not sew all the way to the stop, because the remaining seam below gets sewn with a regular foot and the two stitching lines need to meet without overlapping into a lump.
Step 6: Stitch the Left Side
Close the zipper to check that the right side looks right, then open it again. Now lay the left side of the zipper face down on the left seam allowance. Here is the trick sewing teachers recommend: start at the top again and sew downward, exactly as you did for the right side. Sewing both sides in the same direction keeps the feed dogs from shifting one side relative to the other, which is what causes one side of the zipper to sit higher than the other.
Again, stop about 1/2 inch above the zipper stop and backstitch. Close the zipper. From the right side you should see nothing but a seam line, with the two sides meeting evenly.
Step 7: Press, Then Finish the Seam Below
Press the zipper area from the right side with a press cloth. Gentle pressure only; you are setting the stitches, not flattening the coil. The seam should look like a plain seam with a hidden zipper inside.
Now switch back to your regular presser foot. Starting about 1 inch above where your zipper stitching ended, sew the rest of the seam closed with a normal seam allowance, overlapping the basting line slightly so there is no gap. Then remove the basting stitches above the zipper. Press the whole seam open from the wrong side, and you are done.
For pillow covers and cushions, the method is identical. The only difference is that you usually want the zipper centered in the back panel rather than at an edge, so baste the full back seam first and treat it exactly like a dress seam.
Invisible Zipper Foot vs. Regular Zipper Foot
This question comes up constantly, so here is the straight answer. A regular zipper foot lets you stitch close to the teeth of a standard zipper, but it has a flat sole that presses the coil down only partially. The needle lands 2 to 3 mm from the teeth, which is fine for a visible zipper and wrong for an invisible one.
An invisible zipper foot has the grooves that unroll the coil completely. The needle lands a fraction of a millimeter from the teeth. That tiny difference is the whole game. Buyers say the universal snap-on version works across brands as long as the machine is low-shank, and it is one of the cheapest upgrades in sewing.
Common Mistakes to Avoid
Stitching too far from the teeth. This is the number one cause of visible invisible zippers. Fix: press the coil flat before sewing and keep it fed into the foot’s groove for the full length.
Skipping the basting. Trying to pin a zipper into an open seam and sew it in one pass leads to wavy, uneven results. Fix: baste the seam closed and press it open first. It takes five minutes and saves the garment.
Sewing past the zipper stop. If you stitch all the way down to the stop, the seam below cannot close neatly and you get a pucker or a hole. Fix: stop 1/2 inch above the stop and overlap with the regular seam.
Sewing the two sides in opposite directions. One side ends up longer than the other and the zipper sits crooked. Fix: sew both sides top-down.
Using a zipper that is too short. You lose length at the stop, and a strained zipper bubbles. Fix: buy 2 inches longer than the opening.
Pressing with too much heat. Polyester coils melt and deform under a hot iron. Fix: medium heat, press cloth, quick passes.
FAQs
Can I sew an invisible zipper without the special foot?
You can get close with a regular zipper foot by unrolling the coil with your fingers as you sew, but the result rarely disappears the way it should. The invisible zipper foot is inexpensive and the difference is dramatic, so sewing teachers recommend just buying one.
Which side of the zipper do I sew first?
Convention is the right side first (as you wear the garment), then the left. What matters more than order is sewing both sides in the same direction, top to bottom, so the fabric feeds evenly.
Why is my invisible zipper puckering?
Usually the fabric stretched while you sewed, or the stitching is pulling the coil. Fix: baste the zipper in place before machine stitching, sew slowly, and consider a lightweight fusible interfacing on the seam allowances of shifty fabrics.
What length invisible zipper do I need?
About 2 inches longer than your finished opening. A 22-inch zipper suits most dress and skirt openings, while pillow covers often use 18 to 20 inches depending on the cushion size.
Can I use an invisible zipper in a pillow cover?
Yes, it is the standard choice for cushion backs. Baste the back seam closed, install the zipper as described, and finish the remaining seam. The closure disappears into the seam and looks far cleaner than a lapped zipper.
Do invisible zippers work on heavy fabric?
They work on medium-weight fabrics like denim and twill, but very heavy fabrics (canvas, upholstery weight) strain the fine coil. For those, a heavy-duty regular zipper with a lapped application holds up better.